Increase Page Speed and Performance: Proven Strategies for Reducing JavaScript Bundle Size

A Frontend Developer passionate about building products and solutions using technologies revolving around the Javascript Ecosystem. I have experience working with the MERN Stack and also a big fan of the JAMStack methodology. Currently, I'm exploring Figma in my spare time and other design tools in order to create much simpler and easy to use interfaces for my users.
Page speed and performance are some of the key factors that determine if a user will stay on a website or not. Any website that takes over ~2 seconds for its initial page load isn’t performant. Today's users do not have the patience or attention span to wait long before getting a response on a site. Hence, it has become paramount for any website built today to be fast and responsive, especially during the initial load time.
Have you ever wondered why it’s taking time for your page to load whenever you visit a website? Did you check your network and confirm everything is okay? This is most likely due to the large Javascript bundle being fetched and parsed in the browser. If the JS bundle isn’t optimized, it will result in lower performance and higher user load time.
This article will review strategies and methods to reduce our overall Javascript bundle when deploying to production.
Prerequisites
This article assumes that you have:
Node installed on your local machine
yarn or npm installed on your local machine (npm comes pre-installed with node)
A text editor installed, e.g., VsCode.
Basic knowledge of HTML, CSS, Javascript, and the terminal. (see the link for a refresher on them)
Familiarity with at least one UI Framework, i.e., React, VueJS, or Angular.
Before we proceed, we must understand why we must ensure our Javascript bundle is optimized and reduced to the smallest bundle size before deploying to production.
Why Do We Need To Ship Smaller JS Bundles to Production?
Shipping small Javascript bundles to production is paramount as it's one of the major factors contributing to a website's overall performance. It determines how long a user waits for a page, whenever it’s visited, and what kind of experience the user gets on the webpage, especially for first-time users. It’s in the best interest of the business owners to ensure they don’t keep users waiting while their page is loading.
In the background, whenever a page is visited, the browser makes an HTTP request to the server to download the assets and files needed for that page. The Javascript files are then parsed and executed before rendering occurs. After completing these processes, user interaction becomes active on the page. All these depend on how large the Javascript bundle is, so optimizing and reducing the overall bundle size is a necessity every serious business owner must perform.
There are various factors resulting in large javascript bundles in our project. Some of them include:
Ignoring bundle sizes: Not paying attention to the bundle size of libraries and packages being installed.
Lack of clean and readable code: The kind of code we write also determines how fast our Javascript files get parsed, compiled, and executed. If there are any sections in our code where we’ve ignored best practices and well-tested patterns, it’ll eventually affect the execution time of our javascript file in the browser.
Absence of bundlers and compilers: Bundlers and compilers play a huge role in ensuring our overall javascript bundle is the bare minimum as we enjoy benefits like Minification, Code-Spliting, Tree-Shaking, and so much more. So, ignoring these tools would result in shipping a plain javascript file without the abovementioned features. The file would still run fine in the browser. However, important metrics like parse/compile time, execution time, memory usage, etc., all get affected.
Having gone over why we need to ship smaller Javascript bundles and identifying the factors that lead to large bundles in our project, we will now discuss the strategies and methods we can employ to reduce our JS bundles. I’ve listed all the strategies we’ll discuss below:
Using a bundler, e.g., webpack, parcel, vite, etc.
Bundle Size Inspection
VsCode Import Cost Plugin
Webpack-Bundle-Analyzer
Others include Source-Map-Explorer, Bundle-Buddy, Bundlephobia e.t.c
Code-Splitting
Lazy-loading
Using a Bundler
The first step in achieving a smaller, optimized bundle size is using a code bundling tool. Bundling means merging all our Javascript files and modules into one single file, which will then be executed in the browser. With bundling, we enjoy benefits like Minification, Tree-Shaking, Code-Splitting, etc., out of the box without going through them ourselves.
Fortunately, almost all frameworks or UI libraries we use today have a bundler setup by default whenever they are being installed for development. Popular bundlers include webpack, parcel, vite, browserify, rollup, etc.
Bundle Size Inspection
In today’s development world, hundreds of packages and dependencies are usually installed in our project. The best way to reduce our Javascript bundle size is to be conscious and observe how large a dependency or package is after installation. This would enable us to take a step back and weigh our options if it’s best to use the package or develop a hand-written utility to solve whichever problem we might need it for. Various tools have been created to make bundle-size inspection easy and straightforward. However, we will review a few of them, which I feel are the most important: Import Cost Plugin, Webpack-Bundle-Analyzer, and Source-Map-Explorer.
Import Cost Plugin
A popular tool that makes this easy to achieve is the vscode-import-cost plugin. This extension calculates every third-party import we make in our application and displays inline the size of the imported package. It is also available as a standalone package for other IDEs integration.

Webpack-Bundle-Analyzer
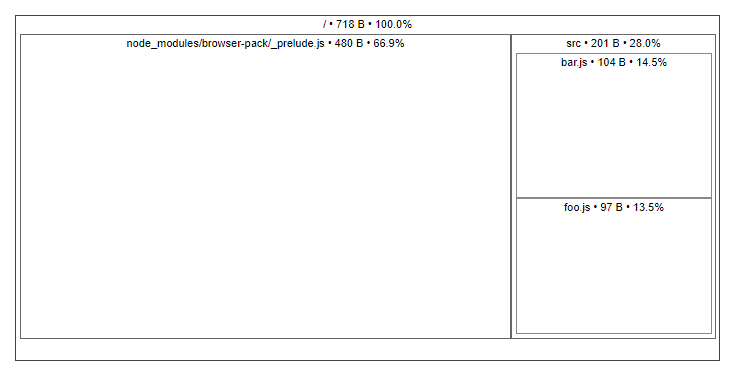
This popular webpack plugin helps users visualize their bundle sizes in a treemap and help identify which package or dependencies need to be removed. It visualizes each file in our bundle as interactive blocks that can be clicked and zoomed on for us to inspect all dependencies. Setting up webpack is pretty straightforward. However, one downside is that it can only be used in projects with webpack installed as its code bundler.
Webpack-bundle-analyzer can be installed using the following commands:
npm install --save-dev webpack-bundle-analyzer
Paste the following snippet in your webpack.config.js file:
const BundleAnalyzerPlugin = require('webpack-bundle-analyzer').BundleAnalyzerPlugin;

module.exports = {
  plugins: [
    new BundleAnalyzerPlugin()
  ]
}
Then run your build command:
npm run build
// OR
npx webpack -—config webpack.config.js
This will create and open an interactive treemap visualization of the contents of all your bundles in the browser.
Source-Map-Explorer
Source-Map-Explorer is an excellent alternative to webpack-bundle-analyzer. It analyzes our Javascript bundles using source maps and helps identify where our code bloat comes from. It’s also handy for people who have bootstrapped their React applications with the CRA (create-react-app) setup and have no intention of ejecting their application.
To install the source-map-explorer, run the command below:
npm install -g source-map-explorer
Then add the code snippet below to the “scripts” section in your package.json file:
"scripts": {
   "analyze": "source-map-explorer 'build/static/js/*.js'",
   "start": "react-scripts start",
   "build": "react-scripts build",
   "test": "react-scripts test"
}
Finally, run the npm run build and npm run analyze commands in your terminal.
This will create a visualization in your browser and show how the space is used in your minified bundle.
Code Splitting
This is the process of splitting our code into various bundles or chunks, which can be loaded later in the future when needed. It can dramatically improve our app's performance as only the bundles required for a page are loaded in the browser. Code Splitting can be done by most bundlers out there, and it’s all a matter of identifying the files that are required for the initial page load.
For most bundlers, the best way to introduce code-splitting is through the import() syntax.
“The import() syntax, commonly called dynamic import, is a function-like expression that allows loading an ECMAScript module asynchronously and dynamically into a potentially non-module environment.” - MDN
The difference between this import() function and the static import keyword is that the former can be used anywhere within a module or non-module file, while the latter can only be used in top-level modules.
Most frameworks have also improved how code-splitting can be implemented in their applications. For instance:
In React, code-splitting can be implemented using React.lazy() and Suspense.
In NextJS, we have NextJS Dynamic Import.
In VueJS, we can import defineAsyncComponent().
A perfect use case for dynamic import would be with a Language Switcher. Imagine a webpage supporting about 3 - 5 locales, which users can toggle using a dropdown. Loading and bundling all the translations for all five locales would be inefficient and affect the webpage load time performance. One way to optimize this is by loading the translations dynamically.
import i18n from “i18next”;

// Initialize i18n instance
i18n
 .use()
 .init({ … })


export const handleLoadLanguage = async (locale = "en") => {
    const messages = await import(`../translations/${locale}.json`);
    i18n.setLocaleMessage(locale, messages.root);
    await i18n.changeLanguage(locale)
};
Other use cases where dynamic import would be helpful include:
Displaying a modal: a modal is shown conditionally in most cases
Displaying a Date-Picker component
Loading user comment sections on a blog or website
UI for a page not rendered immediately
One thing to keep in mind is to ensure that dynamically fetching a file or component in the background doesn’t affect user experience and make the UI feel unresponsive or delayed while the user is on a page.
Lazy Loading
Lazy loading is an optimization technique mostly used in web browsers. However, it is a form of code-splitting as well because the files are only loaded until a certain condition has been met. In most cases, lazy loading is implemented for images and media-related assets. They get loaded when the user reaches a visible part of the viewport or when interaction occurs with an image. One popular way components can dynamically be loaded on interaction is using the Intersection Observer API.
An excellent example is a Product-Listings page. Loading all the products simultaneously would require considerable bandwidth, increasing load time as the products are loaded. Hence, with Lazy-loading, only the products a user can see in the viewport would be downloaded, then on scrolling down the webpage, the rest of the products would be downloaded on demand. Implementing a strategy like this would result in substantial performance gains for the website.
Here are Airbnb product listings being lazy loaded:

Conclusion
The size of our Javascript bundle remains an essential factor to consider when optimizing our webpage for performance. However, achieving a performant website not only has to do with our javascript bundle. Other strategies like Image and Font Optimization, serving via CDN, Caching static pages, etc., are all non-javascript-related methods that need to be in place to achieve the best performance for our site.
Hence, the journey to obtaining that state of performance we all yearn for on our websites is not achieved in a single run. Instead, it requires frequent optimizations and strategies being put in place to ensure users of our website get the information they need on time.
I hope you found this article helpful and have learned a few methods to achieve the required performance we all want for our websites. Feel free to contact me via LinkedIn or Twitter if you have any questions.
Resources
How to analyze your Javascript Bundles, Google Chrome Developers Channel, Youtube
Small Bundles, Fast Pages: What to do with too much Javascript, Calibre
Improving Javascript Bundle Performance with Code-Splitting, Smashing Magazine
Optimizing Javascript Bundle Size, DebugBear
5 Methods to Reduce Javascript Bundle Size, Bits and Pieces